Section describes approach how to automatically make decision about results of performance test
BETA:
This page describes new functionality in beta state. Functionality is introduced in ver 1.2.5 and is feature complete.
We keep our right to introduce incompatible changes to this functionality
Scope
This section describes how to compare your results with predefined reference values or baseline session values
and decide whether performance of your system meet acceptance criteria or not. As result of comparison you
can make decision and mark this test session with status flag (OK, WARNING, FATAL, ERROR). Session status will be visible
to Jagger Jenkins plugin. In WebUI and PDF report summary values will be highlighted according to results of comparison
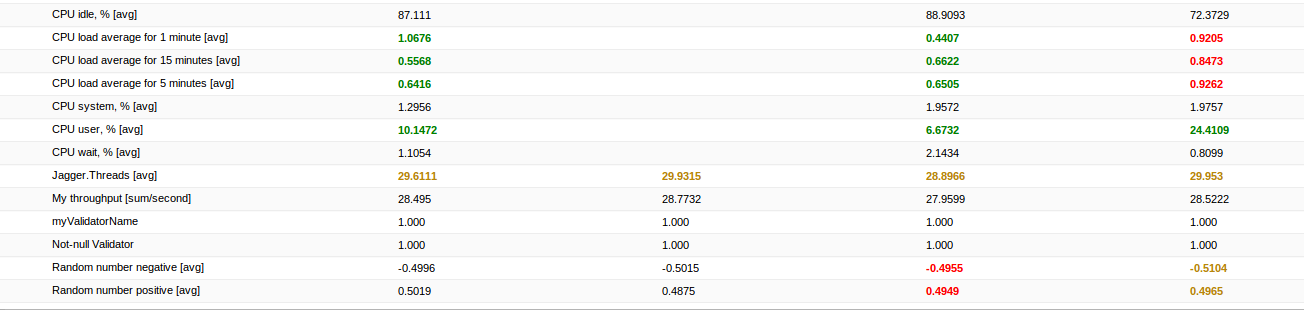
Example of result highlighting in WebUI after comparison with limits
Overview
Steps to go:
Code presented in detailed description below is available in Jagger archetype-examples
Setup properties
To provide comparison of your results to baseline values it is necessary to select baseline session Id
It is also recommended to disable deprecated methods of decision making.
Set following properties in you environment.properties file or via system properties:
# begin: following section is used for docu generation - Decision making by limits main
# # # Baseline session Id # # #
# Baseline session ID for session comparison.
# By default this value is set to '#IDENTITY' => session will be compared with itself (for testing purposes). Comparison will always pass
# If you would like to compare with some previous run, set this property equal to baseline session Id (f.e. 115)
# Comparison will only work if test data is stored in DB
chassis.engine.e1.reporting.session.comparison.baseline.session.id=#IDENTITY
# # # Use only decision making based on limits # # #
# Set true if you want to use only limits based decision making
# When this property is true following deprecated methods are disabled and can't influence decision for session:
# - comparison of all standard metrics to single threshold for all tests
# - evaluation of success rate during report construction
chassis.decision.maker.with.limits.is.only.decision.maker=true
# end: following section is used for docu generation - Decision making by limits main
additional setting to define behavior in case of errors:
# begin: following section is used for docu generation - Decision making by limits aux
# # # Decision when no matching metric for limit is found # # #
# Valid when you are using decision making with limits
# Describes: What decision should be taken when limit is specified, but no metric in the test matches metricName of this Limit
# Default: OK - because this is not critical (you can specify limits in advance - it doen't influence quality of results)
# Allowed values (Decision enum): OK, WARNING, ERROR, FATAL
chassis.decision.maker.with.limits.decisionWhenNoMetricForLimit=OK
# # # Decision when no baseline value is found for metric # # #
# Valid when you are using decision making with limits
# Describes: What decision should be taken when baseline value can't be fetched for some metric (f.e. test or metric doesn't exist in baseline session)
# Default: FATAL - because we can not compare results to baseline => we can not take decision
# Allowed values (Decision enum): OK, WARNING, ERROR, FATAL
chassis.decision.maker.with.limits.decisionWhenNoBaselineForMetric=FATAL
# # # Decision when several limits match single metric # # #
# Valid when you are using decision making with limits
# Describes: What decision should be taken when several limits match same metric (f.e. 'mon_cpu' & 'mon_cpu_user' will match 'mon_cpu_user|agent_007 [127.0.1.1]|-avg')
# Default: FATAL - because in this case we will have several decisions (equal to number of matching limits) => we can not decide what decision should be saved for this metric
# Allowed values (Decision enum): OK, WARNING, ERROR, FATAL
chassis.decision.maker.with.limits.decisionWhenSeveralLimitsMatchSingleMetric=FATAL
# end: following section is used for docu generation - Decision making by limits aux
Back to
Overview
Describe limits for measured parameters
- What metrics can be compared to limits
- You can apply limits to all measured parameters (aka metrics):
- standard metrics (throughput, latency, percentiles)
- monitoring metrics (resource utilization measured by Jagger agents)
- custom metrics, validators
Summary values of these parameters will be compared to limits.
- How to describe limits
- You can describe limits in any configuration XML file. Best practice - use separate file for this (f.e. limits.conf.xml)
On example below you can see one set of limits. There can be as many sets of limits as you need.
Example of limits description:
<!-- begin: following section is used for docu generation - description of limits for metrics -->
<limits id="myLimits">
<!-- S T A N D A R D M E T R I C S -->
<!-- Compare throughput to value from baseline session -->
<!-- Baseline session Id is set in property file -->
<!-- We expect that throughput will not decrease below 50% of baseline value -->
<limit xsi:type="limit-vs-baseline" metricName="throughput" LET="0.5" LWT="0.6" UWT="10.0" UET="100.0"/>
<!-- M O N I T O R I N G M E T R I C S -->
<!-- By default summary for monitoring metrics is not calculated. Do not forget to enable this calculation in property file. -->
<!-- See necessary setup in the bottom of environment.properties file -->
<!-- Compare cpu load average (CLA) and cpu user usage to reference values -->
<!-- We expect that user will not use more that 50% of CPU time -->
<!-- We expect that CLA will not exceed 4 (this example was developed on system with 4 CPU cores) -->
<limit xsi:type="limit-vs-value" metricName="mon_cpu_user" refValue="50" LET="0.0" LWT="0.01" UWT="1.0" UET="1.1"/>
<limit xsi:type="limit-vs-value" metricName="mon_cpula_" refValue="2.0" LET="0.0" LWT="0.01" UWT="1.9" UET="2.0"/>
<!-- Compare garbage collection to reference values. We expect that no garbage collection will occur -->
<limit xsi:type="limit-vs-value" metricName="mon_gc_minor_unit" refValue="0.1" LET="-1.0" LWT="-0.9" UWT="0.9" UET="1.0"/>
<limit xsi:type="limit-vs-value" metricName="mon_gc_minor_time" refValue="0.1" LET="-1.0" LWT="-0.9" UWT="0.9" UET="1.0"/>
<limit xsi:type="limit-vs-value" metricName="mon_gc_major_unit" refValue="0.1" LET="-1.0" LWT="-0.9" UWT="0.9" UET="1.0"/>
<limit xsi:type="limit-vs-value" metricName="mon_gc_major_time" refValue="0.1" LET="-1.0" LWT="-0.9" UWT="0.9" UET="1.0"/>
<!-- C U S T O M M E T R I C S -->
<!-- Compare custom success rate metric to reference value -->
<!-- We expect success rate 1.0 -->
<limit xsi:type="limit-vs-value" metricName="exampleSuccessRate-aggSR" refValue="1.0" LET="0.9999" LWT="0.99999" UWT="1.00001" UET="1.0001"/>
<limit xsi:type="limit-vs-value" metricName="exampleSuccessRate-aggFails" refValue="0.1" LET="-1.0" LWT="-0.9" UWT="0.9" UET="1.0"/>
</limits>
<!-- end: following section is used for docu generation - description of limits for metrics -->
There can be following types of limits. See description of XML attributes under type name links or in the description of Limit class.
limit-vs-value - metric will be compared with defined value
limit-vs-baseline - metric will be compared with value from baseline session
- Where to get ids of standard and monitoring metrics
- To define limit for metric you need to know id of metrics.
- standard metrics ids. Use values from list below:
public static final String THROUGHPUT_ID = "throughput";
public static final String LATENCY_ID = "avgLatency";
public static final String LATENCY_STD_DEV_ID = "stdDevLatency";
public static final String FAIL_COUNT_ID = "failureCount";
public static final String SUCCESS_RATE_ID = "successRate";
public static final String DURATION_ID = "duration";
public static final String ITERATION_SAMPLES_ID = "samples";
- monitoring metrics ids:
Monitoring metrics settings
- custom metrics ids - you should know them. They are custom
- How limits and measured values are matched
- How limits will match to metrics:
- First exact match will be checked. Metric id from database will be compared to metricName attribute of limit
- If first will not match, metric id from database will be compared to regular expression "^metricName.*"
This means limit with metricName 'mon_cpula_' will match metrics with ids:
mon_cpula_1|jagger_connect_57 [127.0.1.1]|-avg
mon_cpula_5|jagger_connect_57 [127.0.1.1]|-avg
mon_cpula_15|jagger_connect_57 [127.0.1.1]|-avg
- How to enable summary calculation for monitoring metrics
- NOTE: Pay attention that summary is not calculated for monitoring parameters by default. You need to enable this calculation
in property file. Like on example below:
# begin: following section is used for docu generation - How to enable summary calculation for monitoring metrics
# Uncomment following lines to enable summary value calculation for some of monitoring metrics
#chassis.monitoring.mon_cpula_1.showSummary=true
#chassis.monitoring.mon_cpula_5.showSummary=true
#chassis.monitoring.mon_cpula_15.showSummary=true
#chassis.monitoring.mon_cpu_user.showSummary=true
#chassis.monitoring.mon_gc_minor_unit.showSummary=true
#chassis.monitoring.mon_gc_minor_time.showSummary=true
#chassis.monitoring.mon_gc_major_unit.showSummary=true
#chassis.monitoring.mon_gc_major_time.showSummary=true
# end: following section is used for docu generation - How to enable summary calculation for monitoring metrics
Back to Overview
Attach limits to particular test(s)
- How to attach limits to test
- After describing limits you can attach them to some test or tests. That means your limits will be used
to verify results of some test(s) and make decision. Single set of limits can be attached to several tests.
It is convenient when same acceptance criteria are used for different tests.
Example. Attaching set of limits to the test:
<!-- begin: following section is used for docu generation - attaching limits to test -->
<test-group id="tg_groovyInvokerGroup">
<test id="t_invokerTest" testDescription="td_groovyGooglePageTest">
<load xsi:type="load-threads" count="1"/>
<termination xsi:type="termination-iterations" iterations="100" maxDuration="2m"/>
<!-- Limit set 'myLimits' will be used to verify results of this test and make decision -->
<limits xsi:type="limits-ref" ref="myLimits"/>
</test>
</test-group>
<!-- end: following section is used for docu generation - attaching limits to test -->
Another option is to define limits directly in the test, like on example below.
It is useful when you are not planing to reuse limit set.
Example. Define set of limits in the test:
<!-- begin: following section is used for docu generation - description of limits for metrics directly in test -->
<test id="t_googlePage" testDescription="td_googlePageTest">
<load xsi:type="load-threads" count="1"/>
<termination xsi:type="termination-background" />
<!-- Limit set below will be used to verify results of this test and make decision -->
<limits xsi:type="limits-group">
<limit xsi:type="limit-vs-value" metricName="exampleSuccessRate-aggSR" refValue="1.0" LET="0.99" LWT="0.999" UWT="1.001" UET="1.01"/>
<limit xsi:type="limit-vs-value" metricName="exampleSuccessRate-aggFails" refValue="0.1" LET="-1.0" LWT="-0.9" UWT="0.9" UET="1.0"/>
</limits>
</test>
<!-- end: following section is used for docu generation - description of limits for metrics directly in test -->
- How limits based decision is made
- Metrics for one test are compared with limits => decision per metric
- Decision per test = worst decision for metrics belonging to this test
- Decision per test group = worst decision for tests belonging to this test
- Decision per session = worst decision for tests groups belonging to this test
NOTE: Step #3 by default is executed by BasicTGDecisionMakerListener class. You can override it with your own TestGroupDecisionMakerListener
How to implement custom listeners you can read here: Custom listeners
Back to Overview
View results in WebUI and PDF report
Summary value for metrics compared to limits will be highlighted in PDF report and WebUi according to result of comparison
- OK - green
- WARNING - yellow
- FATAL or ERROR - red
NOTE: Currently highlighting is supported only for:
- monitoring metrics
- custom metrics
Standard metrics and validators will be compared to limits and influence decision, but not highlighted
To switch off highlighting - set following property to false:
Web client:
webui.enable.decisions.per.metric.highlighting=true
PDF report:
report.enable.decisions.per.metric.highlighting=true
Back to
Overview
 1.8.4
1.8.4

