

Installation
Who is this for? Complete setup reference for all installation modes.
When should I read this? When you need the full picture: plugins, offline, or the optional MCP modes (HTTP, STDIO) and their environment variables. For the fastest path, see Quick Start.
[!WARNING] You must receive prior approval from your manager and company to use Rosetta.
[!WARNING] Use Sonnet 5 medium, GPT-5.6-terra-medium, gemini-3.7-flash-high or newer models. Avoid Auto model selection.
[!NOTE] There will be conflict if you have similar plugins installed: JUXT, Superpowers, GSD, AI-DevKit. Use the ones you have the most experience with.
Choose Your Mode
| Plugin | HTTP (MCP, optional) | STDIO (MCP, optional) | Offline | |
|---|---|---|---|---|
| Setup | IDE-specific install or extract zip | Single URL, OAuth automatic | Env vars, API key per user | Download zip, copy files |
| Local dependencies | None | None | Python 3.12+, uvx | None |
| Auth | None | OAuth via browser | API key from Rosetta Server | None |
| Network | Download only | Requires internet | Requires internet | No network needed (with local models) |
| Best for | Most users — recommended | IDEs with no Rosetta plugin, or centrally-managed deployments | Custom configs, controlled MCP environments | Very rarely needed — developing Rosetta itself, or a plugin genuinely unavailable |
Step 1: Install
Pick one mode and follow its section. Start with Plugin unless you have a specific reason to use MCP (HTTP or STDIO) — see MCPs Installation for when that applies.
Plugin-Based Installation
Rosetta publishes plugins for supported IDEs. Each plugin installs the full Rosetta instruction set locally. Every plugin supports two installation methods:
- Marketplace — managed install from a plugin marketplace. Easier; preferred when available.
- Standalone — manual zip extraction into your repo. For agents without a marketplace path, or environments that block external marketplaces.
Read more about plugin contents and capabilities in Plugins.
Claude Code
Claude Code
Marketplace
claude plugin marketplace add griddynamics/rosetta
claude plugin install rosetta@rosetta
Cursor
Cursor
Marketplace
[!NOTE] To add the plugin you need to have the appropriate Cursor plans, such as Teams and Enterprise.
To import the Rosetta GitHub repository to your team/company internal marketplace:
- Use the following repository: https://github.com/griddynamics/rosetta
For detailed setup instructions, see the Cursor documentation:
- https://cursor.com/docs/plugins#team-marketplaces
ALTERNATIVE: Plugins installed in Claude Code are automatically available in Cursor.
[!WARNING] Cursor automatically detects and uses Claude Code plugins. To avoid duplicate tools, commands, and context, do not install the same plugin separately in both Claude Code and Cursor. If you don’t want Cursor to pick up Claude Code plugins at all, go to Cursor Settings → Rules, Skills, Subagents and turn off Include third-party Plugins, Skills, and other configs.
Standalone
- Download
core-cursor-standalone-*.zipfrom the latest release. - Extract the archive contents into your repository.
- Verify you can see a file
.cursor/agents/architect.md. Ensure there are no.cursor/.cursorfolders.
GitHub Copilot
GitHub Copilot
GitHub Copilot runs in VS Code and JetBrains. Use Marketplace install when available; Standalone is a fallback for either IDE.
Marketplace (VS Code and JetBrains)
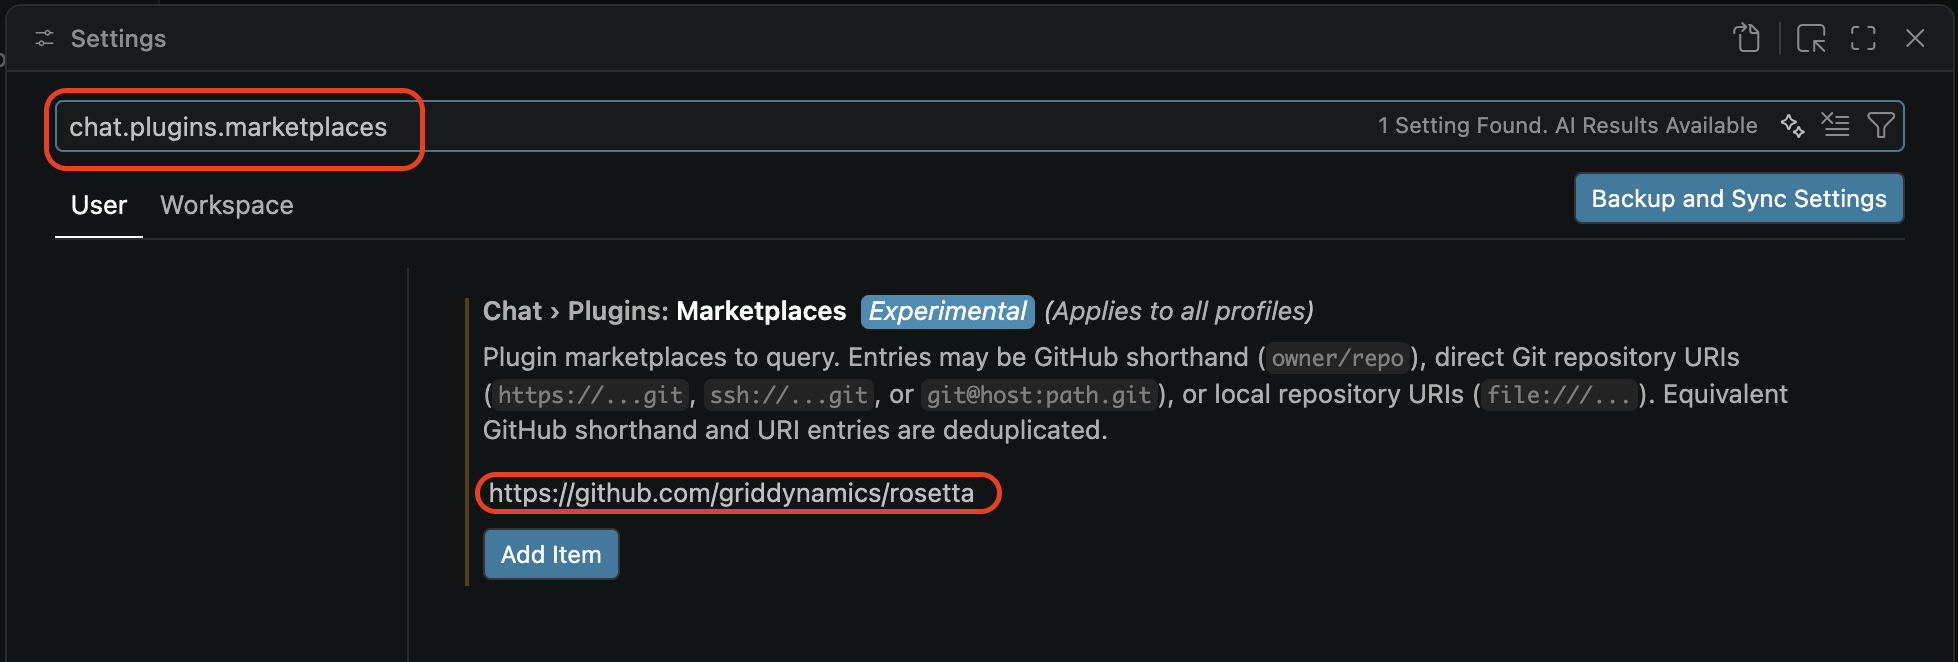
- In VS Code settings, add
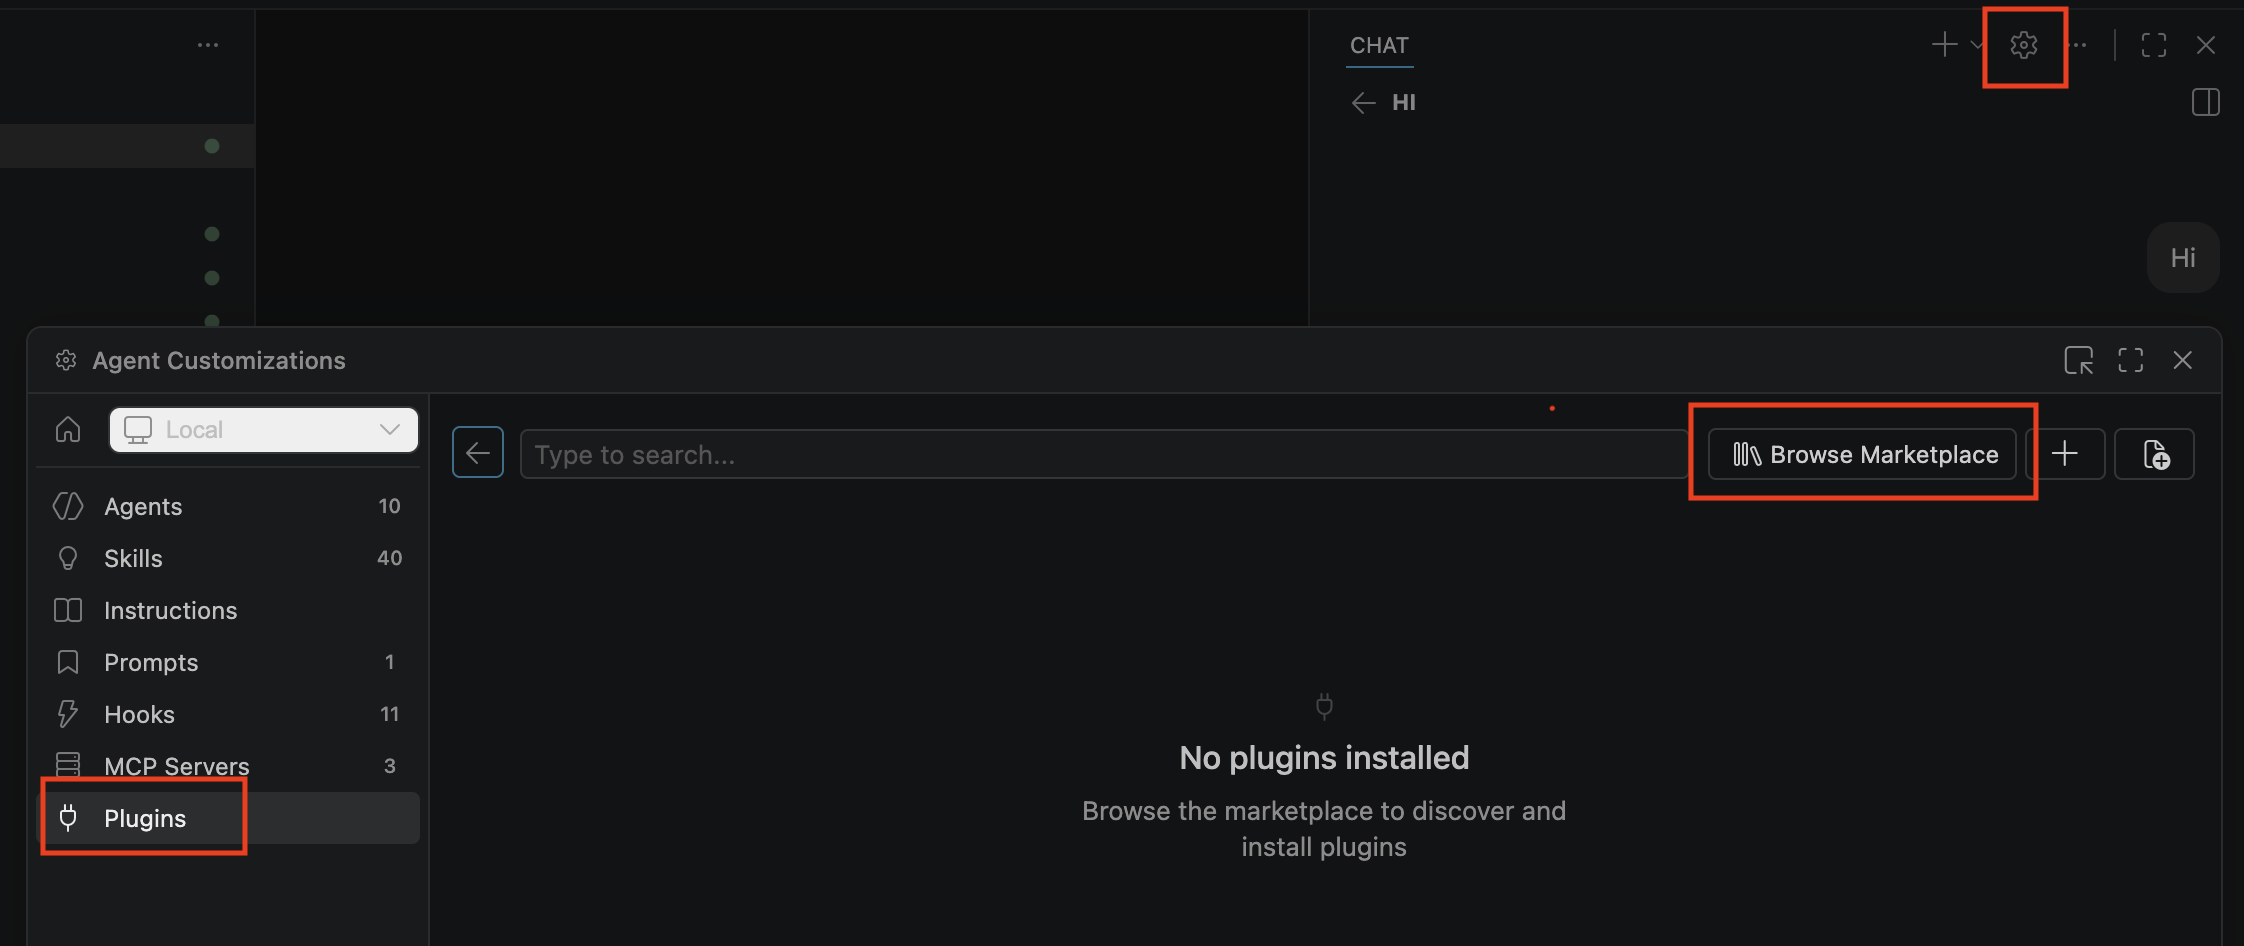
https://github.com/griddynamics/rosettatochat.plugins.marketplaces. In JetBrains, add the same URL under the GitHub Copilot plugin’s marketplace setting (menu path may vary by IDE version). - Open the Copilot chat panel, click the settings gear icon to open agent customizations.
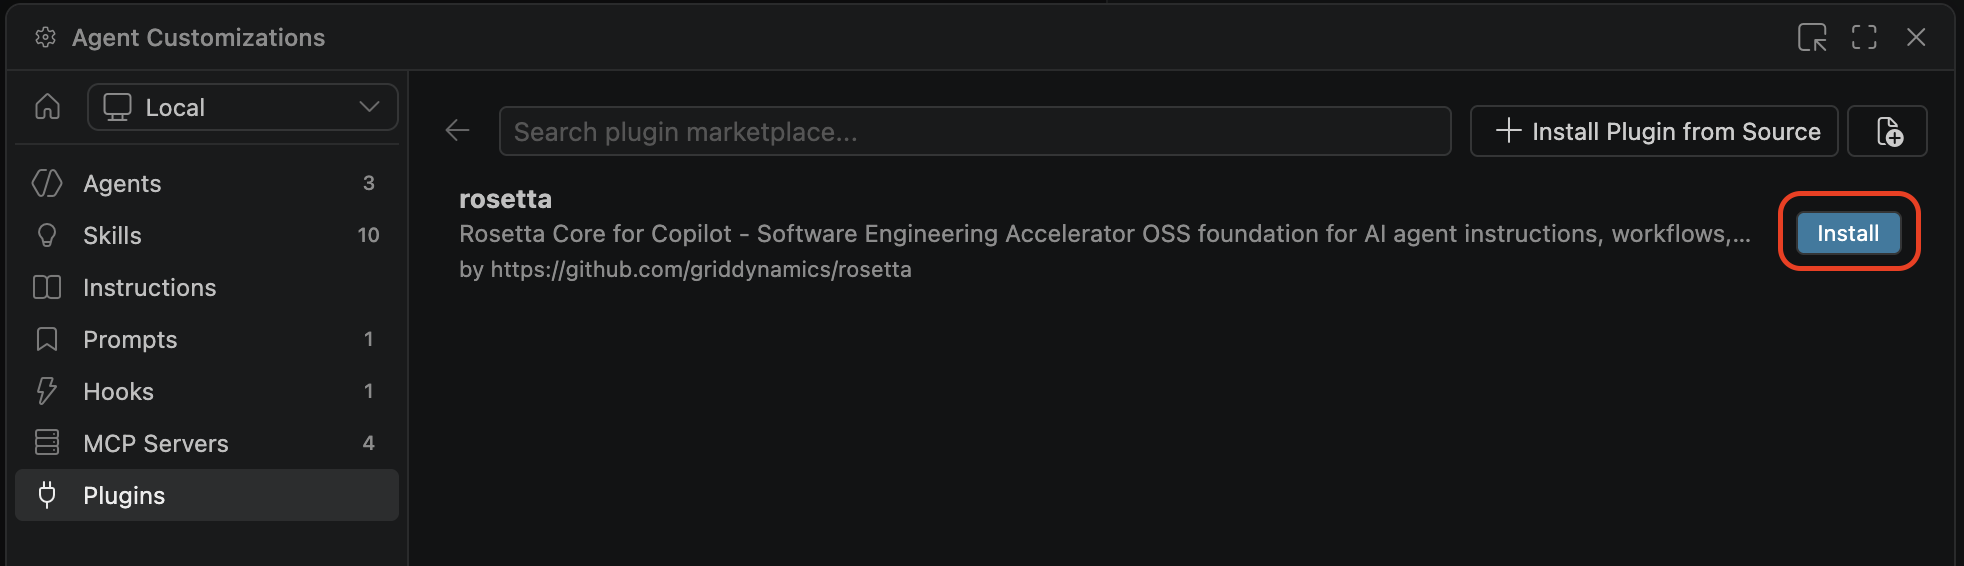
- Click Browse Marketplaces, then install for
rosetta.
Standalone (VS Code and JetBrains) — fallback
Use when your Marketplace/plugin catalog isn’t available, or to avoid a live registry dependency.
[!NOTE] The standalone installation is also detected by VS Code, so installing Rosetta through the standalone and marketplace methods will result in duplicate tools, commands, and context.
- Download
core-copilot-standalone-*.zipfrom the latest release. - Extract the archive contents into your repository.
- Verify you can see a file
.github/agents/architect.agent.md. Ensure there are no.github/.githubfolders.
Codex
Codex
[!NOTE] Codex plugins currently support hooks, MCPs, and skills only (as of April 2026).
Standalone
- Download
core-codex-*.zipfrom the latest release. - Extract the archive contents into your repository.
-
Enable hooks:
codex features enable hooks
Antigravity
Antigravity
One plugin serves Antigravity 2.0, Antigravity CLI, and Antigravity IDE.
Standalone
- Download
core-antigravity-*.zipfrom the latest release. - Create the folder
.agents/plugins/rosetta/at your workspace root. - Extract the archive contents into it.
- Verify you can see a file
.agents/plugins/rosetta/plugin.json. Ensure there are no.agents/plugins/rosetta/core-antigravityfolders.
For all workspaces instead of one, extract into ~/.gemini/config/plugins/rosetta/ — same contents.
HTTP Transport (MCP, optional)
Use this only if your IDE has no Rosetta plugin, or you specifically need centrally-managed instructions — see MCPs Installation.
[!NOTE] Rosetta is designed to never use or see data or IP. Instead it uses inversion of control, by providing a “menu” to AI coding agents.
[!NOTE] The endpoint below (
mcp.rosetta.griddynamics.net) is a public hosted instance for evaluation only — do not point production or sensitive repositories at it. Production use of MCP means deploying your own MCP server and RAGFlow inside your organization’s perimeter — see Deployment Guide.
Rosetta uses HTTP MCP transport with OAuth.
- Pick your IDE and add the configuration.
- Authenticate to MCP using GitHub account according to IDE.
Cursor
Add to ~/.cursor/mcp.json (global) or .cursor/mcp.json (project):
{
  "mcpServers": {
    "Rosetta": {
      "url": "https://mcp.rosetta.griddynamics.net/mcp"
    }
  }
}
Claude Code
claude mcp add --transport http Rosetta https://mcp.rosetta.griddynamics.net/mcp
Codex
codex mcp add Rosetta --url https://mcp.rosetta.griddynamics.net/mcp
codex mcp login Rosetta
VS Code / GitHub Copilot
Add to .vscode/mcp.json or ~/.mcp.json:
{
  "servers": {
    "Rosetta": {
      "url": "https://mcp.rosetta.griddynamics.net/mcp"
    }
  }
}
GitHub Copilot (JetBrains)
Settings > Tools > GitHub Copilot > MCP Settings. Add to ~/.config/github-copilot/intellij/mcp.json:
{
  "servers": {
    "Rosetta": {
      "url": "https://mcp.rosetta.griddynamics.net/mcp"
    }
  }
}
Restart IDE after changes.
JetBrains Junie
Settings > Tools > Junie > MCP Settings > + Add > As JSON:
{
  "mcpServers": {
    "Rosetta": {
      "url": "https://mcp.rosetta.griddynamics.net/mcp"
    }
  }
}
Windsurf
Add to your Windsurf MCP config:
{
  "mcpServers": {
    "Rosetta": {
      "url": "https://mcp.rosetta.griddynamics.net/mcp"
    }
  }
}
Antigravity
Add to your Antigravity MCP config:
{
  "mcpServers": {
    "Rosetta": {
      "serverUrl": "https://mcp.rosetta.griddynamics.net/mcp"
    }
  }
}
OpenCode
Add to opencode.json:
{
  "mcp": {
    "Rosetta": {
      "type": "http",
      "url": "https://mcp.rosetta.griddynamics.net/mcp",
      "enabled": true
    }
  }
}
Any MCP client that supports HTTP transport can connect using the endpoint URL. Complete the OAuth flow when prompted.
STDIO Transport (MCP, optional)
STDIO runs Rosetta MCP as a local process. Your IDE launches it and communicates over stdin/stdout.
Get Your API Key
- Open Rosetta Server (RAGFlow)
- Create an account or sign in
- Generate an API key from your profile
Join Your Team’s Datasets
Your team lead shares Instructions datasets. You must accept the invite before you can see them. Check your Rosetta Server inbox for pending invitations.
Configure Your IDE
Required environment variables:
| Variable | Value |
|---|---|
ROSETTA_SERVER_URL |
[RAGFlow production server URL] |
ROSETTA_API_KEY |
Your personal API key |
ROSETTA_USER_EMAIL |
Your email address |
Cursor
Add to ~/.cursor/mcp.json (global) or .cursor/mcp.json (project):
{
  "mcpServers": {
    "Rosetta": {
      "command": "uvx",
      "args": ["rosetta-mcp@latest"],
      "env": {
        "ROSETTA_SERVER_URL": "[RAGFlow production server URL]",
        "ROSETTA_API_KEY": "your-api-key",
        "ROSETTA_USER_EMAIL": "you@example.com"
      }
    }
  }
}
Claude Code
claude mcp add --transport stdio Rosetta \
  --env ROSETTA_SERVER_URL=[RAGFlow production server URL] \
  --env ROSETTA_API_KEY=your-api-key \
  --env ROSETTA_USER_EMAIL=you@example.com \
  -- uvx rosetta-mcp@latest
Codex
codex mcp add Rosetta \
  --env ROSETTA_SERVER_URL=[RAGFlow production server URL] \
  --env ROSETTA_API_KEY=your-api-key \
  --env ROSETTA_USER_EMAIL=you@example.com \
  -- uvx rosetta-mcp@latest
VS Code / GitHub Copilot
Add to .vscode/mcp.json or ~/.mcp.json:
{
  "servers": {
    "Rosetta": {
      "type": "stdio",
      "command": "uvx",
      "args": ["rosetta-mcp@latest"],
      "env": {
        "ROSETTA_SERVER_URL": "[RAGFlow production server URL]",
        "ROSETTA_API_KEY": "your-api-key",
        "ROSETTA_USER_EMAIL": "you@example.com"
      }
    }
  }
}
GitHub Copilot (JetBrains)
Add to ~/.config/github-copilot/intellij/mcp.json:
{
  "servers": {
    "Rosetta": {
      "type": "stdio",
      "command": "uvx",
      "args": ["rosetta-mcp@latest"],
      "env": {
        "ROSETTA_SERVER_URL": "[RAGFlow production server URL]",
        "ROSETTA_API_KEY": "your-api-key",
        "ROSETTA_USER_EMAIL": "you@example.com"
      }
    }
  }
}
Restart IDE after changes.
JetBrains Junie
Settings > Tools > Junie > MCP Settings > + Add > As JSON:
{
  "mcpServers": {
    "Rosetta": {
      "command": "uvx",
      "args": ["rosetta-mcp@latest"],
      "env": {
        "ROSETTA_SERVER_URL": "[RAGFlow production server URL]",
        "ROSETTA_API_KEY": "your-api-key",
        "ROSETTA_USER_EMAIL": "you@example.com"
      }
    }
  }
}
Windsurf
Add to your Windsurf MCP config:
{
  "mcpServers": {
    "Rosetta": {
      "command": "uvx",
      "args": ["rosetta-mcp@latest"],
      "env": {
        "ROSETTA_SERVER_URL": "[RAGFlow production server URL]",
        "ROSETTA_API_KEY": "your-api-key",
        "ROSETTA_USER_EMAIL": "you@example.com"
      }
    }
  }
}
Antigravity
Add to your Antigravity MCP config:
{
  "mcpServers": {
    "Rosetta": {
      "command": "uvx",
      "args": ["rosetta-mcp@latest"],
      "env": {
        "ROSETTA_SERVER_URL": "[RAGFlow production server URL]",
        "ROSETTA_API_KEY": "your-api-key",
        "ROSETTA_USER_EMAIL": "you@example.com"
      }
    }
  }
}
OpenCode
Add to opencode.json:
{
  "mcp": {
    "Rosetta": {
      "type": "local",
      "command": ["uvx", "rosetta-mcp@latest"],
      "enabled": true,
      "env": {
        "ROSETTA_SERVER_URL": "[RAGFlow production server URL]",
        "ROSETTA_API_KEY": "your-api-key",
        "ROSETTA_USER_EMAIL": "you@example.com"
      }
    }
  }
}
Environment Variables Reference
Required for STDIO transport. Optional otherwise.
| Variable | Default | Description |
|---|---|---|
ROSETTA_SERVER_URL |
[RAGFlow production server URL] |
Rosetta Server base URL. Required. |
ROSETTA_API_KEY |
(empty) | API key for Rosetta Server access. Required. |
ROSETTA_USER_EMAIL |
rosetta@example.com |
User identity for authorization checks |
ROSETTA_MODE |
HARD |
HARD adds more content to context with stricter requirements. SOFT is lighter and allows more agent independence, better when mcp-files-mode.md is also used |
INSTRUCTION_ROOT_FILTER |
(empty) | Comma-separated root tags filter for instructions |
ROSETTA_DEBUG |
disabled | Enable debug logs (1, true, yes, on); legacy alias IMS_DEBUG still honored |
POSTHOG_API_KEY |
(disabled) | Your PostHog project API key. Opt-in usage analytics — set to enable, omit or set to DISABLED to disable |
POSTHOG_HOST |
https://eu.i.posthog.com |
Your PostHog instance URL, e.g. https://posthog.internal.company.com |
Do not set VERSION. It uses a server-controlled default for managed upgrades. See MCP Architecture — Tradeoffs for rationale.
Offline Installation (No MCP)
Very rarely needed today — plugins cover the same “no server, no live connection” need for virtually everyone. Mainly used when developing Rosetta itself, or in the rare case a plugin genuinely isn’t available for your IDE.
- Disable or remove Rosetta MCP from your IDE configuration
- Download
instructions.zipfrom the latest release - Extract to
instructions/in your repository or workspace - Copy the contents of local-files-mode.md into your IDE’s instruction file (keep frontmatter!):
| IDE | Destination |
|---|---|
| Cursor | .cursor/rules/local-files-mode.mdc |
| Claude Code | .claude/claude.md |
| Windsurf | .windsurf/rules/local-files-mode.md |
| VS Code / GitHub Copilot | .github/copilot-instructions.md |
| GitHub Copilot (JetBrains) | .github/copilot-instructions.md |
| JetBrains Junie | .junie/guidelines.md |
| Antigravity | .agents/rules/local-files-mode.md |
| OpenCode | AGENTS.md |
Step 2: Add Bootstrap Rule (HTTP and STDIO modes ONLY)
Applies to HTTP and STDIO modes.
Skip if using Plugin or Offline installation.
Download mcp-files-mode.md and add it to your IDE’s instruction file (keep entire contents, including YAML frontmatter):
| IDE | Destination |
|---|---|
| Cursor | .cursor/rules/mcp-files-mode.mdc |
| Claude Code | .claude/claude.md |
| VS Code / GitHub Copilot | .github/copilot-instructions.md |
| GitHub Copilot (JetBrains) | .github/copilot-instructions.md |
| JetBrains Junie | .junie/guidelines.md |
| Windsurf | .windsurf/rules/mcp-files-mode.md |
| Antigravity | .agents/rules/mcp-files-mode.md |
| OpenCode/Cursor | AGENTS.md |
[!NOTE] Some tools (Cline, Kilo) do not read MCP server prompts. For these, mcp-files-mode.md is always required.
Step 3: Verify
Applies to all installation modes. Ask the agent:
What can you do, Rosetta?
The agent should follow Rosetta’s prompts and list its workflows:
- Plugin or Offline: it loads the Rosetta instructions bundled locally — no MCP call.
- HTTP or STDIO (MCP): it retrieves agents, guardrails, and instructions over Rosetta MCP.
Common Issues (MCP)
- OAuth prompt does not appear: restart your IDE and retry the connection. Read more in Troubleshooting — Connection & Authentication.
- Agent ignores Rosetta tools: confirm the MCP server shows as connected in your IDE’s MCP settings. Add a bootstrap rule if the agent still skips Rosetta. Read more in Troubleshooting — Agent Not Using Rosetta.
- Slow or empty responses: check your network can reach your Rosetta MCP host. See TROUBLESHOOTING.md.
Step 4: Initialize Repository
Run once per repository after installation:
Greenfield (new repository):
Initialize this repository using the respective Rosetta workflow, this is a new repository, target tech stack: ..., target architecture: ..., business context: ...
Brownfield (existing repository):
Ask the agent to initialize the repository:
Initialize this repository using the respective Rosetta workflow
Optionally, add details to that same request. If your workspace contains multiple repositories:
Initialize this repository using the respective Rosetta workflow, this is a composite workspace
To tell the agent where dead code or existing specs live:
Initialize this repository using the respective Rosetta workflow, dead code is in <path>, existing specs are in <path>
The agent runs an eight-phase workflow (see Usage Guide — Init Workspace for details):
- Context — detect workspace mode and build file inventory
- Shells — generate IDE/agent shell files from KB schemas
- Discovery — produce TECHSTACK.md, CODEMAP.md, DEPENDENCIES.md
- Rules (optional) — configure local agent rules
- Patterns — extract recurring coding and architectural patterns
- Documentation — create CONTEXT.md, ARCHITECTURE.md, IMPLEMENTATION.md, ASSUMPTIONS.md
- Questions — clarifying questions about gaps and assumptions
- Verification — completeness check and catch-up for missed artifacts
[!NOTE] Composite workspaces: init each repository separately, then init at the workspace level with “This is composite workspace” appended. Dead code or existing specs: mention their location in the prompt to save time.
Workspace Files Created
After initialization, Rosetta maintains these files in your repository. Read more about their purpose in Architecture — Workspace Files.
Committed to SCM:
gain.json- SDLC setup and Rosetta file locationsdocs/CONTEXT.md- business context (no technical details)docs/ARCHITECTURE.md- architecture and technical requirementsdocs/TECHSTACK.md- tech stack of all modulesdocs/DEPENDENCIES.md- dependencies of all modulesdocs/CODEMAP.md- code map of workspacedocs/TODO.md- improvements, feature requests, TODOs (created when needed)docs/ASSUMPTIONS.md- assumptions and unknowns (created when needed)docs/REQUIREMENTS/*- original requirements with INDEX.md (optional)docs/PATTERNS/*- coding and architectural patterns with INDEX.md (optional)agents/IMPLEMENTATION.md- current implementation state (the only changelog)agents/MEMORY.md- root causes of errors and lessons learnedplans/<FEATURE>/<FEATURE>-PLAN.md- execution plansplans/<FEATURE>/<FEATURE>-SPECS.md- tech specsrefsrc/INDEX.md- index of reference documentation (only refsrc file committed)
Excluded from SCM:
refsrc/*(except INDEX.md) - reference knowledge filesagents/TEMP/<FEATURE>- temporary implementation files
Upgrading
-
Plugins (marketplace): Usually upgrade automatically. For Claude Code:
claude plugin marketplace update rosetta claude plugin update rosetta@rosetta - Plugins (standalone): Redownload the zip from releases and replace the extracted files (install again).
- HTTP: No action needed. Server-side upgrades apply automatically.
- STDIO:
uvx rosetta-mcp@latestalways pulls the newest published version. No manual step needed. - Offline: Download the latest
instructions.zipfrom releases and replace the contents ofinstructions/.
Uninstalling
Plugins:
- Claude Code:
claude plugin uninstall rosetta@rosetta - Cursor (marketplace): Remove the Rosetta plugin from your Cursor team/company marketplace install.
- Cursor (standalone): Delete the extracted
.cursor/plugin files from the repository. - VS Code / GitHub Copilot (marketplace): Remove the Copilot agent plugin.
- VS Code / JetBrains / GitHub Copilot (standalone): Delete the extracted
.github/plugin files from the repository. - Codex: Delete the extracted plugin files from the repository
HTTP/STDIO MCP:
- Claude Code:
claude mcp remove Rosetta - Codex:
codex mcp remove Rosetta - Cursor, VS Code, Windsurf, JetBrains, Antigravity, OpenCode: Remove the Rosetta entry from your MCP configuration file
Offline:
- Delete the
instructions/directory and the IDE instruction file content you added
Related Docs
- Plugins - plugin contents and capabilities
- Quick Start - fastest path to a working setup
- MCPs Installation - when and how to use the optional MCP path
- Overview - mental model and terminology
- Troubleshooting - common issues and fixes
- Deployment - org-wide server deployment